Salsa roja (roasted red salsa)

I eat a lot of salsa. A LOT. I am rather notorious for this, in fact. My friend’s boyfriend once innocently asked if I had anything he could snack on — maybe some chips and salsa? My friend nearly fell on the floor laughing at the thought of me not having chips and salsa in the house. There is no risk of that. Ever.

So when my awesome world-traveling chef cousin came to town for a few days, she offered to teach me how to make roasted red salsa and tamales (more on that later). Can you imagine how much I hesitated? Not. At. All.

And people, this salsa. PEOPLE. With a lifetime of tasting, sampling, and gorging research on salsa, I have never in my life had salsa this good.

Note that this makes a lot — a big mixing bowl full. I’m too embarrassed to tell you how quickly it went here. 😀 Without further ado, I give you: The Best Salsa Ever:

  • 16 full size tomatoes, or nearly a produce bag full of roma tomatoes (we used roma)
  • 2-3 yellow onions
  • 20-25 Serrano peppers (remove caps) Note: this many peppers makes it hot. Feel free to reduce # of peppers, or scrape the seeds out of them
  • 8-10 cloves of garlic
  • 1-2 Tbsp salt
  • 1-2 bunches cilantro
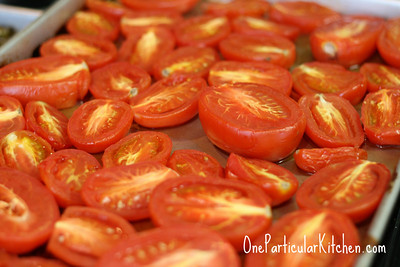
    1. Halve the tomatoes and onions and lay cut-side up on a cookie sheet along with the peppers and garlic
    2. Roast at 375 till the onions look nice and translucent (see bottom left of the next picture), tomatoes look soft, and peppers are getting a nice char on them

  1. Let it all cool a bit, then run through the food processor with salt and cilantro (we had to do this in two batches)
  2. Stir it all together and eat with abandon. Trust me.

Update 6/24/09:

Got questions? Be sure to see the comments below from The Cousin — lots of great info from the salsa expert!

Mediterranean Potato Salad

https://www.smugmug.com/gallery/n-5TtPp/i-GdKf4jn/A


I found the original recipe for this at Simply Recipes while searching for a mayo-free potato salad. When it’s a million degrees here I want something that can handle the heat and stay safe longer than mayo-based salads. This has become a staple in my house! It’s good cold or at room temperature, and the simplified version I make comes together crazy quick.

Here’s what you need:

  • 2 pounds red potatoes, scrubbed clean and cut into bite-size pieces
  • 1/2 pound green beans, trimmed and cut
  • 1 16-ounce jar roasted red peppers
  • Juice of two lemons
  • 1 tbsp mustard
  • 1/4 cup olive oil
  • Salt
  • Pepper
  1. Boil the potatoes in salted water until they’re easily pierced with a fork; scoop them out but don’t drain the water
  2. Boil the green beans in the same water until they’re also tender, or as tender as you like if you’re one of those “tender-crisp” people
  3. Cut the peppers into strips or dice, whatever your little heart desires
  4. Whisk together the lemon juice, mustard, olive oil, salt, and pepper, then add in all the vegetables; taste, and add more salt if needed (potatoes need a lot, I find)

Variations: you can change out the lemon juice for any kind of vinegar: champaign, red wine, balsamic, or apple cider vinegar are all good. You can add some Tony Chachere’s or similar in place of some of the salt if you like a kick to it.

Once it’s been chilled in the fridge, I like it to sit out about 30 minutes or so till the chill is knocked off a bit; then it’s perfect for me.

What other variations should we try?

Fruity chicken salad


The Yankee recently made a discovery, and I’m in love.

With tea.

I used to buy gallons of fruit tea from a BBQ joint called JJ’s in Spring Hill, TN. It was amazing, and usually came in a washed out gallon-size pickle or mayonnaise container. Fine by me, as long as it ended up in my kitchen.

We moved away from Spring Hill about nine years ago, though, and I have been fruit-tea-less and bereft.

UNTIL NOW.

The Yankee found Alley Cat Tea at our local Publix and bought some for me to try. It is the real deal, folks. So much so that they don’t even know I’m writing this review/recipe — they didn’t give me any free or pay me, I just think it’s so great that y’all should know about it. To be fair, they DID offer to give me some tea, but our schedules do not mesh well. 🙂

Anyway!

My favorite is to just drink it straight, but a little Jack Daniel’s in it doesn’t hurt either. 😉 I wanted to find a way to cook with it, too, so I made this fruity/fruit-tea (see what I did there) chicken salad and it’s SO GOOD. It has sweetness from the tea, pineapple, and craisins; it has a tiny bit of sour from the lemon juice, and the chicken holds it all together. It does not have celery, because I don’t like eating dental floss.

To make your own:

  • 2 chicken breasts, marinated (see below)
  • 1 cup fruit tea, divided
  • 2 ounces mayonnaise
  • 1/2 granny smith apple, diced
  • 1/4 cup craisins
  • 1 small can crushed pineapple, drained
  • juice of one lemon
  • Salt, pepper
  1. Cut the chicken breasts into large chunks, and marinate in 3/4 cup fruit tea — at least a couple hours, preferably overnight
  2. Cook the chicken in the tea; I did mine in a slow cooker for about 2 hours, then shred the chicken
  3. Mix cooled, shredded chicken with mayo, apple, raisins, pineapple, lemon juice, plus remaining 1/4 cup fruit tea, then add salt and pepper to taste


This is amazing served as a sandwich on Hawaiian rolls, and also great with crackers for little appetizers. Enjoy!

Fresh salsa

I know. A salsa recipe! From ME! It’s shocking. I’ll give you a minute while you collect yourself.

This one comes courtesy of my BFF’s boyfriend, and it is so good. Very different from my usual roasted salsa roja, and perfect for right now when the tomatoes are in season and easy to find. Around here we can still find a farmer with a card table of tomatoes and a cigar box for cash sitting out at the end of the driveway. Best tomatoes in the world!

Anyway, the salsa is also easily customizable, so you can make it anywhere from diced tomatoes to melt-your-face-off hot (which, you’ve probably figured out by now, is my preferred level of heat).

Fresh salsa:

  • 6 Roma tomatoes
  • 1 medium-large white onion
  • 3 serrano peppers
  • 1 bunch cilantro*
  • salt, and black pepper to taste
  • 3 large limes

To assemble:

  1. Dice tomatoes, onion, and peppers and stir together in a bowl
  2. Chop the cilantro and add in
  3. Add salt and pepper, then squeeze in the juice from the limes
  4. Stir, and enjoy! The longer it sits, the hotter it gets — just something to keep in mind

*A note on cilantro: for the last three years or so I kind of hate it (pregnancy was weird), so the first time I made this myself I just left it out. And I MISSED it. It really makes that much of a difference, so my advice is to try just a little bit in it even if you think you hate it.

Random: this reminds me so much of the now-defunct Salsa Y’all. Does anyone else remember that?

Roasted green beans

Um, hello? *ahem*

Hi, I’m writing a blog post. It’s been forever and I may not really remember how, so bear with me.

I’ve not been blogging. I have been gardening, toting two kids back and forth to two different schools, going to the beach, learning ASL with Peanut (thanks, Signing Time!), and visiting with family.

And, you know, drinking lots of coffee. Normal.

But now! Let’s talk about green beans. It’s one of the few things I can grow in my back yard that doesn’t fall prey to the squirrels, birds, and bunnies. My tomato plants require a moment of silence and deep breaths before I can even look at them.

The beans, however, are everywhere. I pick them every few days, and get about what’s in that picture up there. There are… a lot. And I am thrilled with this.

So here is my new favorite method:

Spicy roasted green beans

Ingredients

  • 1 lb. fresh green beans, washed and checked for strings
  • 1 Tbsp. olive oil or melted bacon fat
  • 1 jalapeño pepper or a few shakes of red pepper flakes (optional)
  • Salt and pepper

Instructions

  1. Preheat oven to 400° F
  2. Toss beans and oil or bacon fat in a bowl till beans are coated, then sprinkle generously with salt and pepper and toss again
  3. Finely dice the pepper and stir it in, or stir in pepper flakes (or both — you could live on the edge)
  4. Scoop onto a cookie sheet or into a cast iron pan, and roast till they’re starting to brown a little; this will probably take at least half an hour or so, but check at 20 minutes and give them a good stir

Options

  • Eat them hot, as is, for a side dish or snack
  • Dip in a little spicy ranch
  • Eat them hot, sprinkled with balsamic vinegar and feta cheese
  • Chill them well, then toss in with a green salad

Would really love to hear what y’all like to do with yours! If the crop keeps going I’ll need more suggestions. 🙂

Baguettes

One of my favorite books is Will Clower’s The Fat Fallacy. It is smart, and makes sense, and has some really incredible (and incredible easy) recipes. One of my favorites is this super simple recipe for baguettes, which I make a few times a week. Kiddo cannot get enough of them! He likes them plain in his school lunches. I like them hot out of the oven with butter. The Yankee likes them with whatever we’re having for supper.

Peanut likes to throw them like lawn darts. Three out of four ain’t bad.

One of my favorite bread tips also came from this book: if the bread is stale or not as soft as you like (Kiddo likes it SUPER soft), just run your hands under water and then over the bread, or spritz the bread with a water-filled spray bottle, then reheat in the oven or toaster oven. Magically you have soft, warm bread, even if it’s days old.

If it’s really past it’s prime? Cut into squares and bake into croĂ»tons, or use for French toast. But really, the chances of it hanging around to get past its prime are slim. It’s really, really good.

I make these often enough that I bought this perforated pan but you certainly don’t have to; a regular cookie sheet is fine.

Baguettes

Ingredients

  • 1 teaspoon instant (bread machine) yeast
  • 1 1/4 cups warm water
  • 3 cups all-purpose flour
  • 1 1/2 teaspoons salt

Instructions

  1. Mix together all ingredients until a slightly sticky dough forms (I don’t proof my yeast, but you can if you want, or if you’re using non-instant yeast)
  2. Knead the dough for about ten minutes by hand, about 1-2 minutes in a food processor or mixer, or throw it all in a bread machine and let it work its magic — you’re looking for smooth dough by the time you’re done kneading
  3. Let the dough rise in a covered bowl until it’s doubled in volume (about an hour), then deflate and form into loaves. Dr. Clower gets two long, skinny loaves out of this; I make shorter ones that are easier to pack for lunch
  4. Cover the loaves and let them rise another hour or so, while the oven preheats to 400F
  5. When you’re ready to bake, spritz or sprinkle the loaves with water — better yet, do that AND put an oven-safe pan full of hot water in the oven to steam the bread as it bakes, and make some slashes across the top so the bread can expand as it bakes
  6. Bake for 20-30 minutes or until bread is as brown as you like. Cool at least ten minutes, then dig in!